Sunday, January 29, 2012

#4 Crazy


#4: Crazy
Finished: 1/29/12
Techniques: Victorian Style Crazy Patchwork, Embossing on Velvet
Size: 16x17"

Description:
While researching Victorian Era Crazy Quilts I learned that nearly any types of fabric and embellishments were used. For my Crazy mini-quilt, I used wools, velvets, corduroys, brocades, satins, and woven fabrics along with various pieces of lace and trim, including fringe on the bottom of the piece. I also read about how to emboss onto velvet using a rubber stamp, and I incorporated three embossings, a sun, a snowflake, and a star, which can be seen in the photo. By laying the velvet face down on top of a rubber stamp, apply a hot iron to the back of the fabric for 30 seconds. I feared that the heat from the iron might damage the stamp, but they all survived just fine.

I also used many decorative stitches on the sewing machine in a variety of embroidery thread colors to add some embellishment.

I did not use any batting on this mini-quilt. Because of the weight of the fabrics, it didn't seem to need it. I "quilted" the piece with a bar tack stitch on each of the individual pieces in a matching color to the fabric. It was like "tying" the quilt, but without the yarn.

This was a fun quilt to do, but working with heavy fabrics was a work-out. I don't know that I'd want to create a full-sized Victorian crazy quilt.

Monday, January 23, 2012

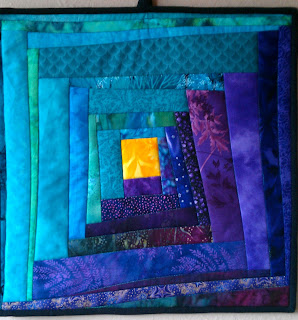
#3 Wonky Cabin


#3: Wonky Cabin
Finished: 1/22/12
Techniques: Off-Center Log Cabin Design
Size: 16" square

Description:
A few years back, a friend gave me tubs and tubs of batik strips of all colors. Most of the strips are between one and four inches wide and they are very uneven. They are beautiful pieces of fabric, and I have trouble throwing away fabric of any kind.  I found several pieces of the aqua or turquoise to work with and paired them with several purples. Some strips were not batik, but fit in with the color scheme. Because the strips were uneven to begin with, a wonky design was the way to go. Instead of a traditional red center, (and this certainly isn't a traditional log cabin design anyway) I chose a bright yellow for the center square. Quilting was done by stitching in the ditch.

Monday, January 16, 2012

#2 Bargello Brights

Mini-Quilt #2: Bargello Brights
Finished: 1/15/12
Techniques: Bargello Pattern, Stitch in the Ditch
Size: 23.5" x 16"

Description: I'm glad I started this project early in the week. It was not difficult, but it was time consuming. The pieces I used were small - no larger than 1-1/2 x 2", so that probably accounts for it. I started with selecting 26 batiks or brightly colored fabrics - 24 for the top, 1 for the binding and 1 for the backing. I had these left over from a quilt I did for my niece with paper-pieced batik stars on a black background. I cut 1-1/2" strips of each top color, sewed them into a tube, cut them various widths, detached each column at the appropriate point, then sewed the rows together again.  Because of the different widths, a wave-like quality appears across the quilt. Before starting the stitch-in-the-ditch quilting, the mini-quilt looked pretty square to me. I had read that, to avoid a lengthening in one direction, one should alternate directions when stitching in the ditch, so that's what I did. However, this seemed to make the rectangles more like rhomboids and it didn't come out very even. Blocking may help. Next time I try this, I think I will try stitching all in one direction to see if it makes a difference. But I do like the colors (I find I'm very partial to bright cheery colors) and I do like the overall effect. One trick was to start with a light-colored fabric and go successively darker over 4-5 fabrics, then start with a new light fabric.

Sunday, January 8, 2012

#1 Furrows of Flowers


Mini-Quilt #1: Furrows of Flowers
Finished: 1/8/12
Techniques: Strip Quilting, Stitch in the Ditch

Description: I have a lot of flower or leaf fabric in my stash, so I gathered them all up and choose several that coordinated. I used 2 1/2 inch strips, pieced them, then cut and stitched at angles for added interest. It reminds me of the time several friends and co-workers got together to make a quilt in one day for a friend who lost much in a house fire. We had everyone bring fabric with flowers - any kind of flowers, any sized prints, any color. The blocks were sashed with green solid fabric, and it was great how everything came together.

One funny note: In my haste to finish this mini-quilt, I added the backing fabric upside-down - a print of a golf course left over from a quilt I made for my nephew.  But since no one will ever really see the back, I left it that way.

What is a slow loris?

A slow loris is one of a handful of species of small primates dwelling in South and Southeast Asia. They are typically described as moving slowly or deliberately, which is an understatement, but there doesn't seem to be any other way to describe their movements. They move in "slow motion"! I saw one at the Audubon Zoo in New Orleans many years ago and stood mesmerized for at least twenty minutes in front of the exhibit. I couldn't look away. Since then, a slow loris has become sort of a "totem" for me.


"Pygmy slow loris." Grzimek's Animal Life. Gale, 2012. Web. 8 Jan. 2012.

Starting Out

Welcome to my first-time-ever blog and a new quilting project for 2012. After hearing about and seeing many mini-quilt projects, I thought I would give it a try. It's a great way to try new quilting or piecing techniques without committing to an entire quilt. That being said, I want to add a little challenge to it by placing some constrictions, or rules if you will, to what I'll be doing:


  • Complete one mini-quilt per week, ending on Sunday (just to give me the weekend if I need it), including piecing, quilting, binding, labeling, and any attachments for hanging.
  • Mini-quilt to be no larger than 18" x 24".
  • Use only materials I already have on hand in my stash of fabric or hoard of craft supplies. Buy nothing new to finish the mini-quilt.
  • Post a picture and details about the mini-quilt in this blog during the following week.
That's about it. Let's see how it goes.